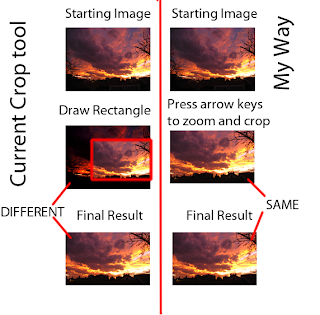
The "crop" tool works the wrong way

The way cropping is universally (as far as I know) implemented in photo editing software is by allowing the user to draw a rectangle on the part of image you want to save. Most programs dim the part you'll be throwing away, which helps you a bit in seeing your final composition, but the image itself doesn't zoom in or out, which is what actually happens when you crop, assuming you keep the paper or display area the same size.
The way it SHOULD be done is how it happens in the blackroom. For those of you who have never developed their own B&W, you use a projector to paint the image from the negative unto the paper, and cropping is accomplished by moving the projector further or closer to the paper, which makes the image larger or smaller by "zooming" it. Of course its also a minor annoyance because the image gets dimmer and you have to refocus, but that doesn't need to carry on to digital.
So the correct way of implementing the crop tool is by displaying the image full screen, and coding the software so that pressing the Right Arrow key pushes the right margin a little out, AND RESIZES THE PHOTO TO FIT THE SCREEN, while pressing Shift+Right Arrow accomplishes the opposite. This way, everytime you change the composition, the final effect is displayed, which is the whole idea behind WYSIWYG.
The astute reader may object that by doing this you no longer see what's in the rest of the photo, but the even more astute reason will chastise him for his professed inability to enlarge a bit the image to check and then make it smaller again.

There are two types of projectors to choose from, DLP and LCD. cheap projector
ReplyDelete